Our answers to your questions

General

  • Which parameters must be considered when choosing a transducer?

    Take into account all aspects of the application

    All aspects of an application must be taken into account for the selection of the transducer and system design, with particular attention to the following:

    • Electrical requirements, including power supply requirements, peak measurement, response time, di/dt and dv/dt.
    • Mechanical requirements, including aperture size, overall dimensions, mass, materials, mounting and vibration.
    • Thermal conditions, including current profile versus time, maximum RMS measurement, thermal resistances and cooling.
    • Environmental conditions, including vibration, operating temperature range and proximity of other conductors or magnetic fields.


    Identify potentially critical elements

    Some applications have a higher level of complexity and combine several potentially critical elements such as:

    • electromagnetic interference
    • significant common mode voltage transients (dv/dt)
    •  mechanical disturbances (vibration, shock, etc.)
    • special isolation or partial discharge requirements
    • compliance with specific standards, etc.


    Perform tests

    Obviously the best scenario is to perform tests in the specific application environment. If this is not feasible, please provide LEM with a diagram of your installation and a detailed description of the transducer operating conditions (e.g. description of the environmental conditions, graph of the waveforms to be measured, nearby potentially disturbing elements such as inductors, current carrying conductors and the presence of magnetic materials or the location of other transducers).

  • How is “primary nominal” rms current or voltage determined?

    Sometimes also called “continuous or rated” current (voltage), it is the maximum permanent thermal current (voltage) that the transducer can carry.

    Another definition is: the maximum rms current (voltage) which may flow through the transducer under specific conditions, so that the temperature during continuous operation does not exceed the specified value. This is measured with a 50Hz sinusoidal signal.

  • What does “measuring range” imply?

    The measuring region is limited by the maximum measurable peak value in non-steady state.

    • Example for closed loop transducers including those based on fluxgate:

      Closed Loop or Flux-Gate transducers

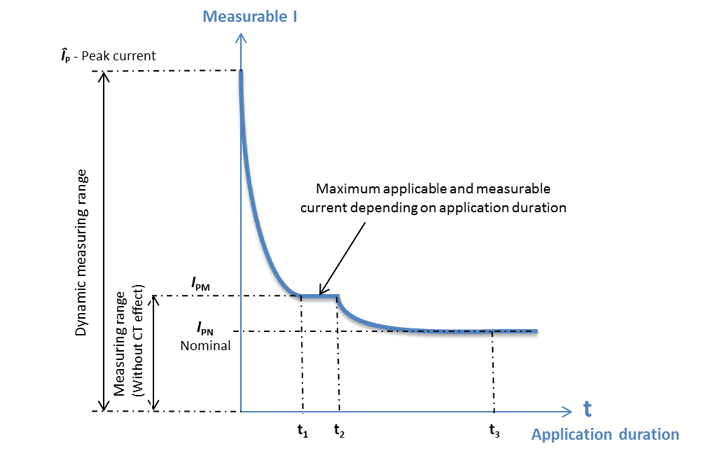
      The transducer can, in fact, measure much higher current values, provided the duration of this current is very brief and non-repetitive. This is then called the dynamic measuring range which is limited by the peak current. In this case, the transducer operates as a current transformer (CT effect).
      The maximum peak current will depend on the load (measuring) resistance, bus bar temperature and transducer’s construction. The dynamic range and the admissible duration times (t1…t3) are not determined and are not indicated in the data sheets because of multiple parameters that can interact.
       
    • For an open loop hall effect transducer
      The measuring range will be linked to the saturation of magnetic circuit or the limit of the voltage output stage.
  • What is the function of the measuring, burden or load resistor (RM, RB)?

    Voltage sensors and current sensors giving a current output need to have a burden resistor (RB or RM - also called measuring or load resistor) connected to their output in order to obtain the correct measurement.

    Closed-loop sensors have an integrated current generator that supplies the output signal. The burden resistor is set to define the best current/ to voltage ratio for your application. Current signals are also much less sensitive to external perturbation, which is important when there is larger distance between the location of the sensor and the control electronics processing its signal.

  • What are the limits of measuring resistor (RM, RB)?

    The measuring resistor has to be within a defined range to allow a safe and optimum operation of the transducer.

    • The minimum resistor value is set for thermal protection of the output power stage of the transducer. This can be 0 Ω for some transducer types (the maximum power supply voltage will be determining for the calculation).
    • The maximum resistor value is set to allow a defined current / voltage measurement range for the transducer. It corresponds to the resistor which will not lead to the electrical saturation. Connecting a higher resistor than the one specified will reduce the measurement range of the transducer (min. power supply voltage will be determining for the calculation).

    In case you need values out of the range specified on the datasheet of the transducer, please contact your technical support. Different values can be computed depending on your application conditions (ambient temperature, power supply voltage tolerances and maximum current/voltage to be measured).

  • What is the transformation ratio?

    The rated transformation ratio K is the ratio of the rated primary voltage or current to the rated secondary voltage or current. For closed loop current transducers, the turns ratio NP/NS is approximately the reciprocal of KR. For example, a turns ratio of 1:1000 implies approximately 1000 secondary turns (KR = 1000) and a secondary current of 1mA with a single primary turn carrying 1A.


    turns ratio


  • What is the current consumption IC ?

    It is the maximum current consumption of transducer’s electronics at the specified supply voltage when the primary signal is nil, added to the secondary current IS . This parameter is applicable only to the transducers with current output.

  • How should the power supply for a transducer be dimensioned?

    Only transducers using the closed loop technology require special care when defining the power supply and its limitations. Due to the working principle of closed loop current and voltage transducers, the current consumption IC can be spit in two parts: a fixed one at primary nil plus the part which is the function of the current/voltage to be measured (IS). The second part can be calculated as follows:

    • For a current transducer: IS = peak primary current x turn ratio
    • For a voltage transducer: IS = (peak primary voltage/primary resistor) x turn ratio
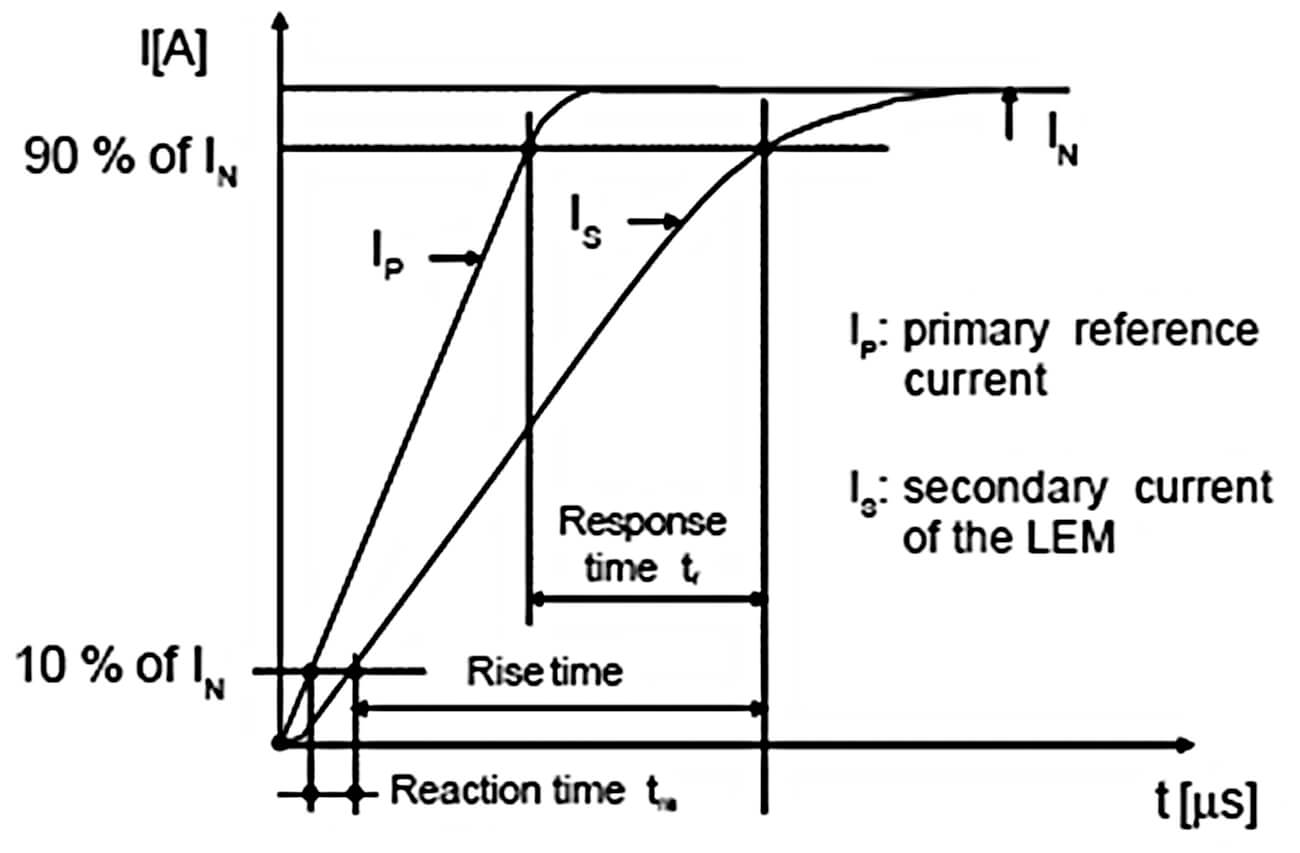
  • How is the response time (tr) defined?

    Used to characterize dynamic behavior of a transducer, step response time is the delay between the primary current reaching 90% of its final value and the transducer’s output reaching 90% of its final amplitude. The primary current shall behave as a current step, with a given di/dt slope (usually 100A/µs) and with the amplitude close to the nominal current value IPN .


    FAQ 9
  • How is the reaction time (tra) defined?

    LEM defines the reaction time (tra) as the delay between the rise time of the output signal and the rise time of the applied signal taken at 10% of the total variation of IPN.

  • What does “di/dt accurately followed” mean?

    Used to characterize dynamic behavior of a transducer and its ability to follow fast changes in primary current, “di/dt accurately followed” is the variation of primary current for which the response time does not exceed 1 ms at 90% of IPN.

  • How is the frequency bandwidth BW defined?

    The bandwidth is the frequency comprised between 0 Hz and the cut-off frequency corresponding to an attenuation of 3dB , unless otherwise specified. It is the measure how rapidly the amplitude and phase of the signal fluctuate with respect to time. Hence, the greater the bandwidth, the faster the variation in the signal parameters may be.

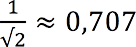
    The attenuation of 3dB corresponds to the half-power decrease or the decrease of the signal amplitude of   formule


    How is the frequency bandwidth BW defined


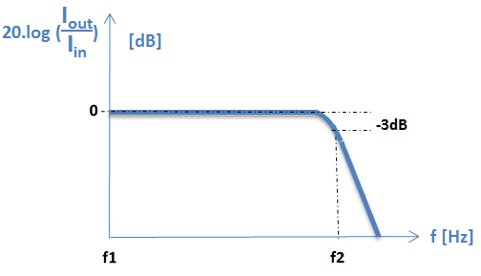
    Nominal current cannot be considered over the full frequency range because of magnetic core heating due to core losses. To keep the power dissipation at safe level, RMS current value shall be decreased while working frequency increases. Therefore the frequency bandwidth given in the datasheet is obtained from measurements at currents of low intensity.

  • Why are transducers subject to core losses?

    The magnetic material and core design as well as the spectral contents of the current amplitude versus frequency define the level of core losses. They are caused by the enclosed area within the hysteresis cycle, shown on the figure below.

    FAQ 13


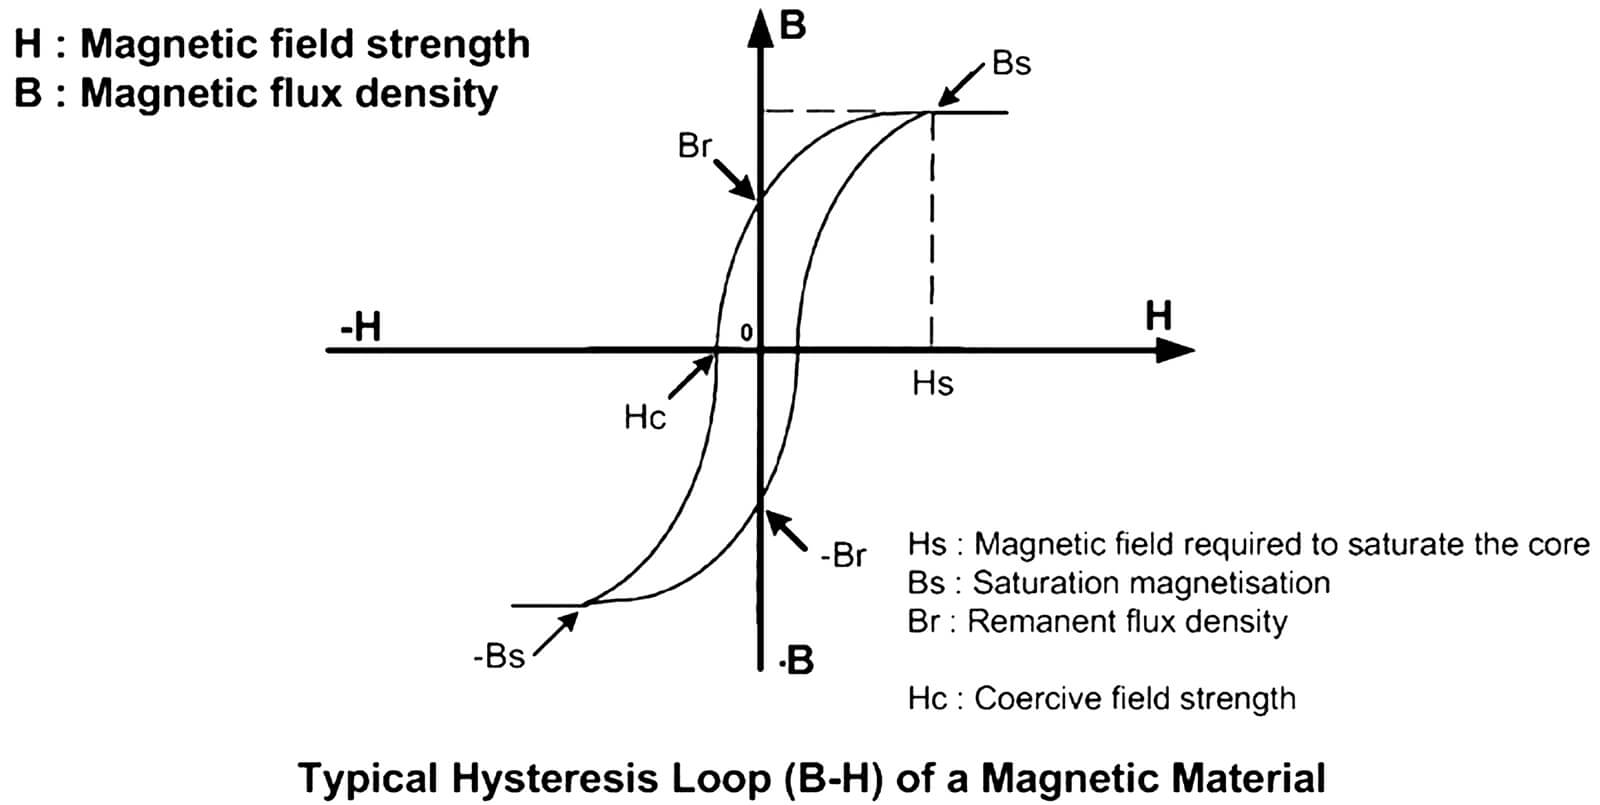
    Core losses are combination of eddy current and hysteresis losses.

    • The eddy current loss is the power absorbed by a magnetic material due to eddy currents, which are loops of electrical current induced within material by a changing magnetic field, due to Faraday's law of induction. These losses are proportional to the square of the: peak flux density in the core, frequency and lamination sheet thickness of the core.
    • The hysteresis loss is the energy loss when the magnetic material is going through a cycling state and is proportional to frequency, core volume and the square of peak flux density.

    Core losses become significant at high frequencies and it is essential to limit the current amplitude at these frequencies to acceptable levels (depending on maximum transducer’s temperatures). This implies not only limiting the maximum frequency of the fundamental current, but also harmonic content, since even a low amplitude signal may create unacceptable losses at high frequencies.

  • What is the current derating versus frequency?

    Because of the core losses in high frequency applications, the current shall be reduced in order to keep the transducer losses constant. Due to the complexity of the core geometry, the dependence of the core losses with the square of frequency, the square of magnetic flux density and the power dissipation by the housing, it is extremely difficult, if not impossible, to compute or to simulate the RMS current derating versus frequency.

    Derating curve of the RMS current versus frequency can be obtained by doing temperature measurements inside the transducer by varying both RMS primary current and the frequency, and ensuring that the maximum authorized temperature is not exceeded.

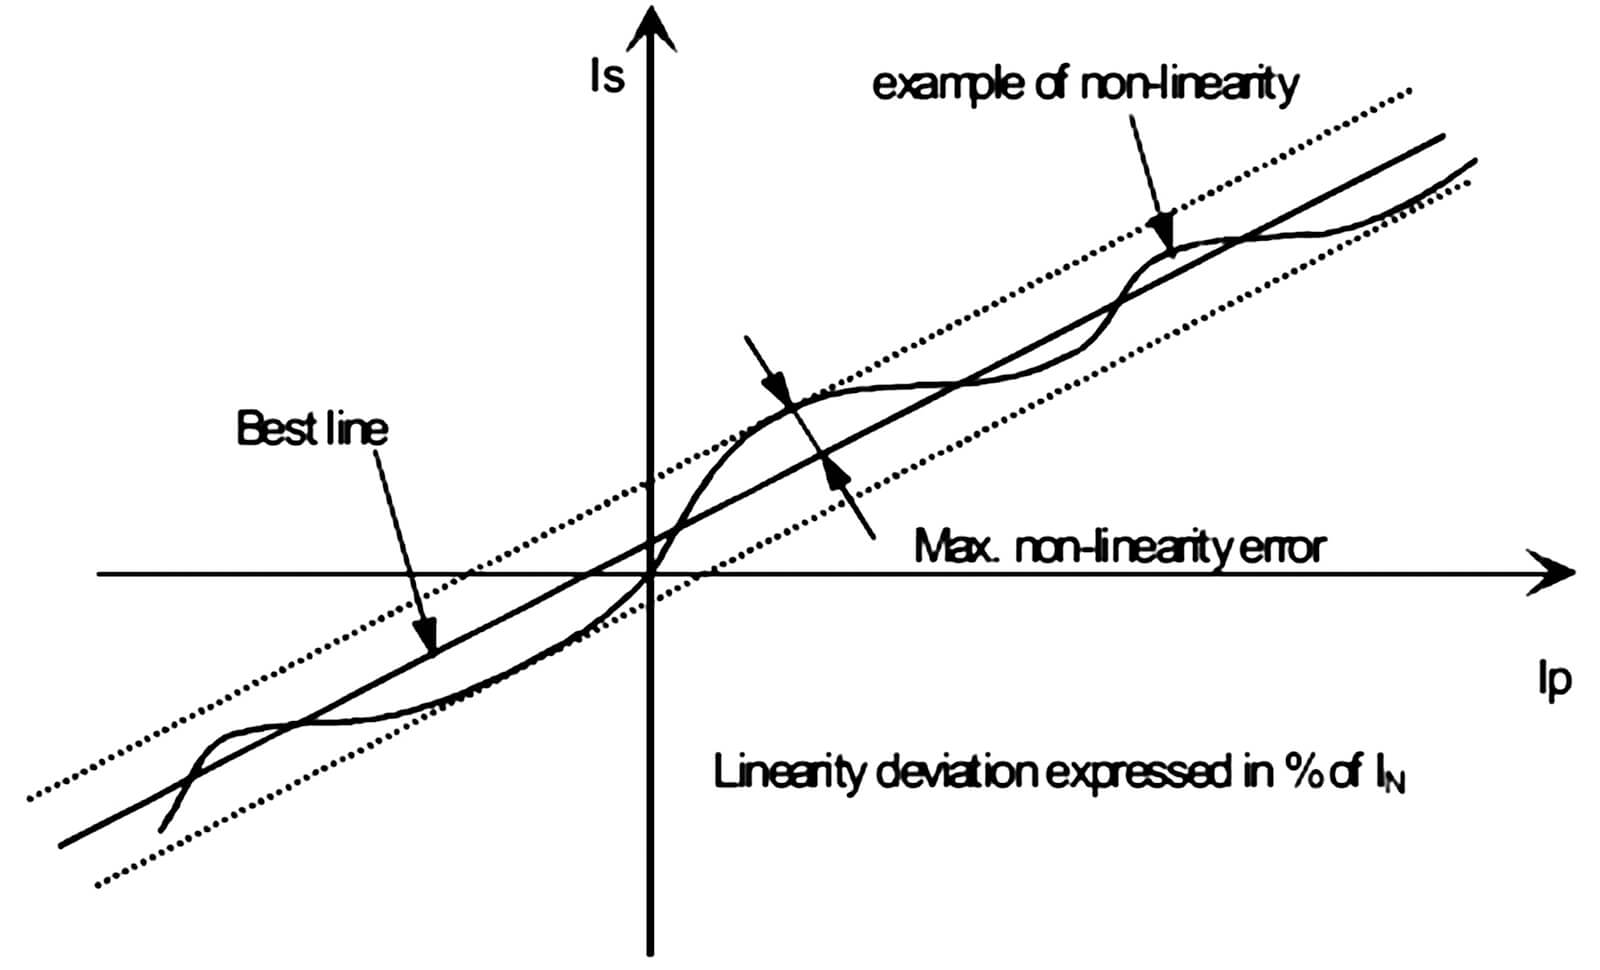
  • How are sensitivity and linearity measured?

    To measure the sensitivity and linearity, the primary current DC is cycled from 0 to IPM then to –IPM and back to 0 .

    The sensitivity G is defined as the slope of the linear regression line over the whole current range (the cycle between ±IPM).

    The linearity error is the maximum positive or negative difference between the measured points and linear regression line, expressed in percent of the maximum measured value.


    FAQ 15


  • What are the advantages of transducers using an ASIC?

    The ASIC (Application Specific Integrated Circuit) is, as the name indicates, an integrated circuit designed to provide several specific functions in one package.

    The advantages are that it offers:

    • Improved overall accuracy
    • Lower cost
    • Smaller size
    • Customized functions
    • Improved behavior in disturbed environments
    • Improved quality level (reliability, aging)
  • How do transducers with a unipolar power supply work?

    The vast majority of LEM closed loop transducers are specified for use with bipolar supply voltages (e.g. ±15 V). However, most transducers can also be operated from an unipolar supply for the measurement of unidirectional currents. In such cases the following must be taken into account (solution is not valid for DV and DVL family):

    • The supply voltage should be equal to the sum of the positive and negative voltages indicated in the datasheet (e.g. a ±15 V product should be powered with +30 V).
    • Selection of the measurement resistance and the maximum current must not imply excessive power dissipation in the transducer’s output stage (do not hesitate to contact LEM to get the correct measuring resistance assessment).
    • The output stage is designed for the use with a bipolar power supply and diodes must be inserted in series with the output to allow a minimum output bias voltage without creating a measurement offset (see the drawing below).


    Transducers with a unipolar power


     The LEM portfolio also includes some transducers dedicated to unipolar operation and use of these is advised as the electronic design and specifications are based directly on expected operating conditions.

  • How can magnetization of the current transducer be avoided?

    Depending on the type of transducer and the magnetic material used, the residual flux (magnetic remanence) of the magnetic core induces an additional measurement offset referred to as ‘magnetic offset’. Its value depends on the previous core magnetization and is at a maximum after the magnetic circuit has been saturated. Magnetization might occur:

    • After a high overload current
    • Due to the interruption (lack) of power supply


    The offset created by the magnetization will disappear:

    • Naturally, over a certain period of time depending on the magnetic material that will slowly recover (this is a very slow process).
    • By performing a demagnetization of the transducer, either by appropriate reversal of the primary current or a dedicated degauss cycle. Thanks to this process transducer can recover its initial performances.
  • Can a transducer be demagnetized?

    The elimination of magnetic offset requires demagnetization. A degauss cycle requires driving the core through the entire B-H loop with a low frequency AC source, then gradually decreasing the excitation returning the B-H operating point to the origin. As a minimum, provide 5 cycles at full amplitude and then decrease the excitation smoothly no faster than 4 % per cycle, requiring 30 cycles or 500 ms at 60 Hz.


    FAQ 19

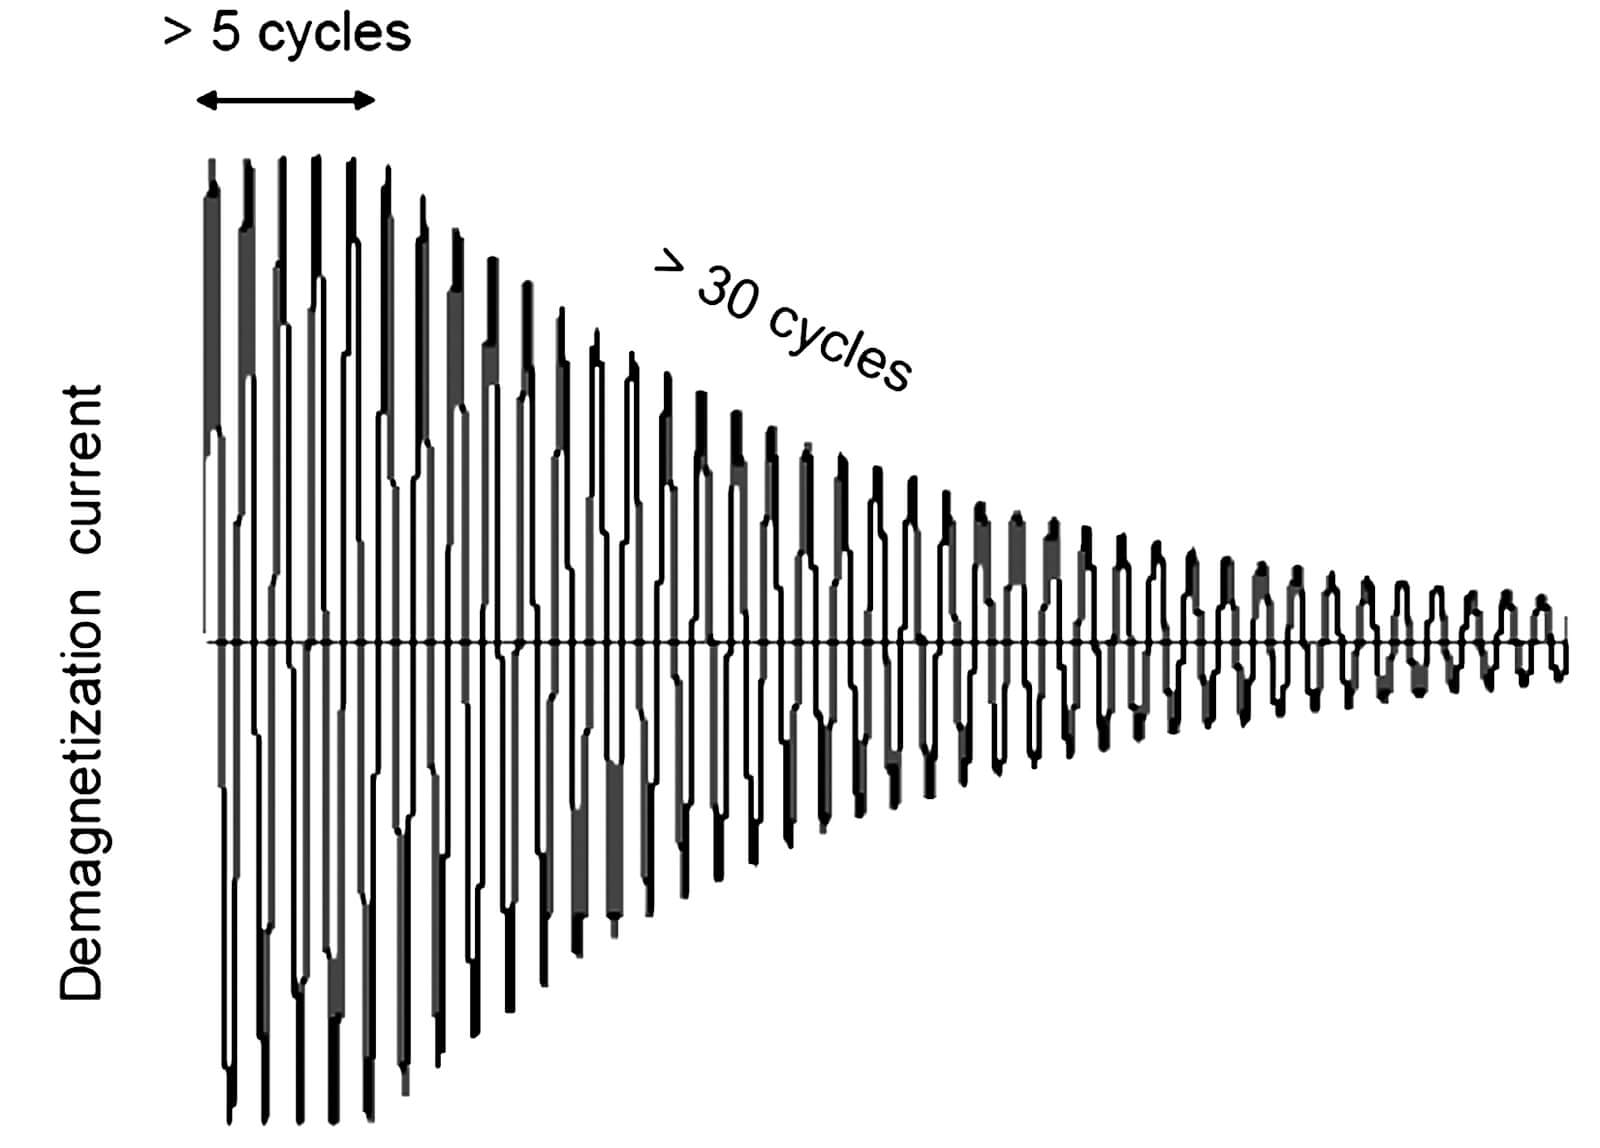
    For closed-loop devices, additional care must be taken to ensure the compensation coil does not negate the demagnetization effect. Alternatively, a partial demagnetization of the core is possible by providing an appropriate signal in the opposite polarity of the magnetization. The difficulty is determining the exact amplitude and duration to obtain a satisfactory result. With a well-defined application it may be feasible to determine the required value empirically and apply this correction as necessary.

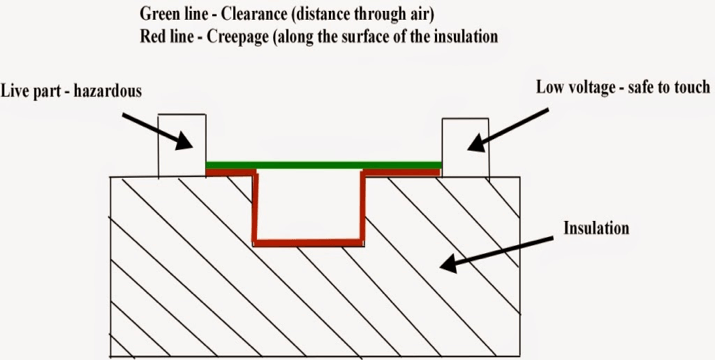
  • What are clearance and creepage distances?

    Several international standards specify safety requirements applicable to the equipment included in their scope, with the main purpose to ensure that hazards to the operator, with respect to electrical, thermal and energy safety considerations are reduced to a tolerable level.

    Customer’s application will define necessary voltage level (rated voltage, over-voltage category), safety level (functional, basic or reinforced insulation) and environmental conditions (pollution degree) whereas transducer’s design should insure safe use thanks to the choice of the insulating material (CTI) and the respect of minimum insulation distances.

    Safety standards specify the requirements for clearances, creepage distances and solid insulation for equipment based upon their performance criteria. They also include methods of electric testing with respect to insulation coordination.


    • Clearance dCl is the shortest distance in air between two conductive parts.
      It shall be dimensioned to withstand the required impulse withstand voltage.
      For operations beyond an altitude of 2000m above sea level, clearance should be multiplied by the correction factor in order to insure withstand voltage level.


    • Creepage distance dCp is the shortest distance along the surface of a solid insulating material between two conductive parts.
      It shall be dimensioned to avoid failure due to tracking along the surface of insulation, and take into account:
      • the pollution degree of the application system
      • the CTI of the insulating material


    Creepage distance needs to be greater or equal to the clearance.


    clearance and creepage distances


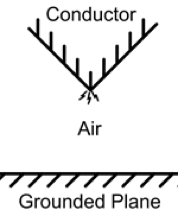
  • What are partial discharge phenomenona explained?

    A partial discharge is an electric discharge which occurs in a portion of an insulated area often in voids.

    As a consequence of high temperature and emission of ultraviolet radiation generated by small electric arcs in the voids, the insulation layer is degraded. Gradually, small cavities increase and arcs begin to develop inside these cavities. The final step is a complete breakdown between the primary and the secondary parts of the transducer.

    If the growth of degraded insulation portions can take several years, the final step takes lasts only one or several electrical periods.


    Conductor

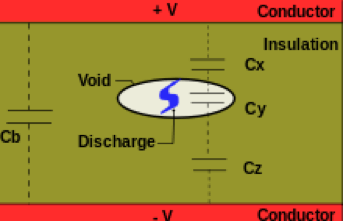
    The aim of the partial discharge test is to ensure a long lifetime of LEM transducers. It ensures that the solid insulation (potting + housing) withstands a high voltage stress in the long run:

    • recurring peak voltage
    • highest steady-state voltage
    • long-term temporary overvoltage


    On LEM data sheets, we either indicate the value of the partial discharge extinction voltage Ue at 10pC level (older datasheets) or the partial discharge test voltage Ut (recent products).


    Results of the test strongly depend on the shape of the busbar (primary conductor) and its position in the transducer aperture.

    • We advise to avoid angles and sharp shapes (otherwise risk of corona discharge can appear)


    Conductor graphic       Conductor


    • Busbar has to be centered in the aperture
    • Dimensions of the busbar:
      • By default, test at LEM is done with the busbar filling the aperture (contact with inner tubing) which is the worst possible case.
      • Specific busbar dimensions might be requested from the customer: Busbar dimension and position must be specified with Ut value.

Wi-LEM: Mesh network - RF communication

  • Automatic detection of any new device in the Mesh network

    When the RF network is active, the Mesh Gate reports in a set of registers (2-17: Active EndNode Device List bitmap) the Modbus addresses of all the devices communicating in the Mesh network. Each device must have a unique address so that it is possible to individually ask for their complete Device ID from Modbus register #347. The low byte reports the Modbus address and the high byte indicates the exact type of device, referring to the following table:

    table mesh1


    In case of EMN devices, it is recommended to read the Model Configuration register (reg. #49) indicating the exact EMN model and the relative scaling factors to apply.The Modbus application must regularly scan any new active or deactivated device.

  • Information on the Mesh network robustness

    For each individual device, some specific Modbus registers provide network information such as the RSSI (Received Signal Strength Information) in register #204 and hops information in registers #201 to #203.

    This data is very useful during installation and maintenance as it allows visualizing the RF network (i.e. the RF link strength and data path from any device to the Mesh Gate).

  • Troubleshooting: the Mesh network is unstable and does not report more than 10 devices

    This happens if the number of nodes exceeds the quantity allowed for a specific Mesh Gate type. The MeshScape Network Monitor application will then display a specific error message. Check your Mesh Gate type. Most probably it is a MG 6424-10 (limited to 10 devices including Mesh Nodes) with Device ID: 170.247.

    In such case, the Mesh Gate must be upgraded to a model allowing to manage more nodes (return to LEM).

  • Visual check of a device’s activity status

    Each Mesh device indicates that it is communicating with the Mesh Gate through its LED flashing:

    • EMN: in normal operation, its LED is blinking once every 2 seconds. A sequence of “2 successive blinks followed by a 1-second pause” indicates that the radio communication is not established.
    • Mesh Node: the STS Led is blinking (single pathway detected) or permanently ON (2 or more possible pathways)
    • Other modules:
      • if externally supplied: the STS Led is blinking (single pathway) or permanently ON (2 or more possible pathways).
      • if supplied by internal batteries, LED information is only reported when the device is powered ON (internal switch) then lights OFF.
  • Long recovery time for the total Mesh network in case of Mesh Gate shutdown

    If for any reason the wireless communication is interrupted, all the devices (including the Mesh Nodes), will scan all the channels (11-26) in order to synchronize with the one set by the Mesh Gate.

    Each device will start with its last available channel, corresponding to a specific frequency between 2.4 & 2.5 GHz. When the complete frequency range has been scanned it will restart to scan again and again. So if the Mesh network is quite large, when the Mesh Gate supply is back, it then requires that all Mesh Nodes implied be first synchronized to have then any End Node communicating, which during this interval time is scanning a different channel …

    In practice, this can take several minutes and up to 1 hour.

  • 2 Mesh networks in the same environment

    Several networks, if properly configured, can be installed in the same site with devices within radio range of each other.

    In order to prevent cross-talk between the networks, their respective configurations must respect the following conditions:

    • Each network must have a unique Group ID and a different channel from the other ones.
    • Each device in the site, whatever network it belongs to, must have a unique Device ID, particularly Mesh Gates and Mesh Nodes. For the Mesh Gate, as the Device ID low byte is fixed at 247 and the Device ID high byte is encoded by LEM for type identification, this implies changing the Device ID high byte by incrementing, for instance, the current one (201.247 instead of default 200.247).
  • Troubleshooting: unstable network but good RSSI values

    Although the RSSI values of each online device are correct, the network may be unstable for the following reasons:
     

    1. Saturation of the data traffic due to a too high number of EMNs and Mesh Nodes. Remember that the EMN broadcast interval has to be increased according to the number of nodes according to the formula:
       
      Min Intl (sec) = 2 * MN + EMN.
       
      Please refer to the “EMN Broadcast & Sampling Interval time reprogramming procedure“ application note (download there).
       
    2. RF perturbation from other wireless network(s) communicating on same frequency. In such case you can select a different radio channel for the Mesh network by just modifying the Mesh Gate’s one. Thanks to the agility capability, all slave devices will scan the Mesh Gate and synchronize with the same channel.
       
      Just keep in mind that this will take several minutes before complete synchronization. The time required depends on the network size and topology.
  • Maximum number of repeaters (Mesh Nodes) between an End Node and the Mesh Gate

    Theoretically, there is no limit to the number of Mesh Nodes used between an End Node and the Mesh Gate. In practice however, attention must be paid to the following points:

    • Each Mesh Node, as well as any Mesh device, must have a unique Modbus address. This means than no more than 246 additional devices can be added to the Mesh Gate.
    • In addition, the number of devices that can be handled depends on the type of Mesh Gate. The MG-6424-10 is limited to a total of 10 devices, the MG-6424-100 to a total of 100 devices and the MG-6424-200 to a total of 200 devices.
    • Finally the minimum broadcast interval time may induce another device limit according to the formula: Min Interval (sec) = 2 x MN + EN.

     
    This may require to increase this setting in configurations with a large number of Mesh Nodes (MN), especially for the EMN whose default value is 20 seconds. Please refer to the “EMN Broadcast & Sampling Interval time reprogramming procedure“ application note (download there).

  • “Hops count” value for any device in the Mesh network

    The hops count reported in the MeshScape Network Monitor and in the Modbus register #201 of a Mesh device, is the number of radio links (“node-to-node leaps”) in the RF pathway from the device to the Mesh Gate.


    meshgate


    In the network topology of the example illustrated above:

    • The EMN with ID xxx.10 has a hops count of 2: one to the device with ID xxx.242 (“first hop” reported in reg. 202) + one from that device (“last hop” reported in reg. 203) to the Mesh Gate. In such case, “first hop” and “last hop” are the same device.
    • The Mesh-Node with ID xxx.223 has also a hops count of 2 via the ID 242 node.
    • The Wi-Pulse with ID xxx.110 has a hops count of 3: one to the ID 223 node (“first hop” reported in reg. 202); one from the ID 223 node to the ID 242 node and finally from this node (“last hop” reported in reg. 203) to the MeshGate.
    • The EMN with ID xxx.120 has a hops count of 1 since it has a direct connection to the Mesh Gate.


    Some network topologies may have a great number of Mesh Nodes, with low hops counts for each device. Some others may require a higher number of successive Mesh Nodes and induce bigger hop counts.

Wi-LEM: Modbus application

  • Commissioning done by communicating with the Mesh Gate through Modbus or Mesh Scape Network software mandatory

    The MeshScape Network Monitor software provides the following information useful for the commissioning:

    • list of all active devices with their respective status, type, complete Device ID, individual RSSI, hop counts with the first and the last hop (indicating the selected pathway),
    • network’s Group ID and channel number (information from Mesh Gate) , …


    All this data is now available from Modbus registers so that the final application can report or display the network topology and configuration. It is no longer needed to switch the communication with the Mesh Gate from Modbus to standard (MACS) mode to access this information.

  • Troubleshooting: the values reported by the Modbus application seem incorrect (ie. double of what was expected)

    Most probably, the error is due to using the wrong scaling factors. Check the tables reported in the user guide (§4.2.2) (download there) and please note a different table should be used for EMN/SP2 models.

  • Set the UTC time in Mesh Gate each time it is switched on

    It's mandatory to set the UTC register whenever the Mesh Gate is powered on.as the value of this register is not permanently saved and restarts from 0 after a power on reset. In addition it is recommended to regularly set it to prevent any de-synchronization, the Mesh Gate being in charge of regularly resynchronizing all the Mesh devices with its own UTC value.

  • Recommended polling interval on Modbus communication with the Mesh Gate

    If the internal microprocessor has to manage too frequent Modbus accesses, it will create a bottleneck and slow down the RF communication. It is therefore not recommended to poll too rapidly, but to respect a minimal period (e.g. typically 1 second). In the same idea, the Mesh Gate is not able to buffer too many Modbus commands and only allows a few consecutive Modbus accesses, typically less than 10.

    On the other hand, whenever there is no Modbus access to the Mesh Gate for a period of 30 minutes, all internal registers are cleared. Of course most of them will be refreshed with the new data transmitted by radio, but if you poll with a period close to 30 minutes, you may just read some data as 0.

  • Resetting the counters (accumulated values) in an EMN

    Could it be performed with any of the free softwares provided by LEM (EMN Monitor, MeshScape Network Monitor, …)?

    The counters can only be reset by accessing the relevant Modbus registers, which are only available through a Modbus application but neither with MeshScape Network Monitor nor MeshScape Programmer.

    However the EMN Monitor is not providing any "automatic" procedure to perform this resetting. This application is a simple free demonstration software allowing to visually report energy consumption.

    Some basic softwares such as Modbus Poll running on Windows OS, allow to directly access Modbus registers and perform a "Write Multiple" command to register’s address #52 with data 0x01.

    Just note that if you are using a “smart PLC” which automatically transforms a Modbus Write Multiple Registers (code 0x10) to a single resource into a Write Single Register (code 0x6), this latter will not be accepted by the Mesh Gate. Therefore you can force a Modbus Write Multiple Registers to the 2 consecutive registers #52 (command word) and #53 (recording interval time) to send the reset command and overwrite the interval time (default 5 minutes).

  • EMN’s Modbus register writing takes several minutes

    The Modbus writing is first acknowledged by the Mesh Gate with the exception code “05” to prevent any timeout error. It signals that the device is processing the command by transmitting it to the relevant EMN by RF. This requires a complete Radio communication exchange, which will take a few minutes. It is therefore usually recommended to poll a register to determine if the process has been completed.

Wi-LEM: About the EMN

  • EMN accuracy

    All the EMN devices are certified to Class 1 according to IEC 62053 for Active Energy, meaning that the overall precision is better than 99% in the range 10% to 120% of the nominal current value (Ipn). They are certified Class 3 for reactive Energy (max 3% error).

  • EMN’s LED is not blinking

    If the LED is not flashing at all, the EMN device is certainly not powered.

    Except for the specific EMN D3/SP2 which requires an external 24VDC power supply, all standard EMN devices are self-powered from the L1 and N input lines. Therefore, the L1 and Neutral lines must at least be connected.

  • Minimum connections required for an EMN

    At least 2 lines - L1 and Neutral - must be connected to power a standard EMN device.

    Moreover, as an Energy Meter, the EMN requires current and voltage sample values to measure energy. The current is measured by the CT or RT sensors each dedicated to one electrical phase, and the voltage from the lines L1, L2, L3, N (3 phases and Neutral) that must be connected to the corresponding phases.

  • EMN’s LED blinking 3 times

    The LED is blinking 3 times when the EMN frequency is not within the 50 to 60 Hz range. Since the frequency measurement is performed on line L1, check on this input if the frequency is out of the range (45-65 Hz) or if the voltage is below 70Vrms.

  • EMN’s LED blinking 5 times

    The LED is blinking 5 times to report an EEPROM checksum error during the last EMN power off. The main cause is a parameter modification not correctly completed when a Modbus write access has been performed during the power off sequence. Such an error is non-permanent and the signal will disappear as soon as a new correct power off/on cycle is performed.

    In order to avoid such trouble, it is recommended to keep the EMN always powered on. Ideally it is better to have a safe power supply (UPS), in order to have the EMN still monitoring the low or zero consumption during breakdowns.

  • Negative active energy

    In case of a negative active energy value on one or more phases, check that the relevant CT(s) or RT(s) is(are) mounted in the correct direction according to the current flow, the positive one being indicated by the arrow on the transducer. Also check the correct phases allocation (CT1 or RT1 for L1, CT2 or RT2 for L2, and CT3 or RT3 for L3).

  • Negative reactive energy

    The reactive energy values can be negative, depending on the load type:

    Q (VAR) = Ueff * Ieff * sin φ, φ being the current / voltage phase difference

    sin φ <0 in case of a capacitive load

    sin φ >0 in case of an inductive load

    sin φ =0 in case of a pure resistive load

  • Data refresh period for EMN regarding counters and accumulated values Approximately 1 minute!

    In order to refresh the complete Modbus registers table, each EMN device needs to send 3 data packets to the Mesh Gate, each packet having a maximum size. By default, the EMN device is set to send a new packet periodically, roughly every 20 sec.

    Actually the microcontroller prepares a data packet for the End Node radio communication module that is in charge of adding the time-stamp and transmitting it. Depending on potential higher-priority End node tasks, this operation takes 20s +/- 1 to 2 sec. Therefore, the interval time that should be one minute (3x20s) may vary by a few seconds.

    This variation is not critical as new values in the counters are time-stamped with the exact time from the EMN internal clock (with a precision of 1 second). Therefore when accessing the counters values, the application must also read their timestamp information in the Modbus registers #24, #25, #26, which are not precisely synchronized on the minute interval.

    For registers based on interval time (“Recording Interval” registers), it is not the case as this internal EMN process is synchronized with the interval time and the data is stored at this exact time. In this case the time stamp values in the Modbus registers #28, #29, #30 are exact multiples of the Recording Interval Time.

  • Date & time update in EMN

    Each EMN module has its own UTC register and its own clock.

    The UTC register stores the number of seconds elapsed from January 1st 1970.

    This date/time information is not saved in case of power off, so that after a power cycle the EMN will send data time-stamped from January 1st 1970 , until its register is re-synchronized by the Mesh Gate. The Mesh Gate regularly transmits by RF its own date/time value to all the modules in the network.

    It is therefore critical that the application periodically updates the Mesh Gate date & time by writing its UTC registers 19 (MSW) and 20 (LSW) in one access.

  • Decreasing the EMN data refresh period to get higher reporting rate

    Referring to the “EMN Broadcast & Sampling Interval time reprogramming procedure“ application note (download there), it is possible to change the default data refresh period, which is 60 sec., depending on the number of EMN and Mesh Node devices.

    In the simplest case of just 1 EMN device communicating directly with the Mesh gate (without any Mesh Node), the broadcast interval can be decreased to 1 second, and the Modbus register refreshed every 3 seconds.

    If  a Mesh Node is used, the EMN broadcast interval can be decreased to 3 seconds, and a complete Modbus registers table refreshed every 9 seconds.

  • Installing an EMN inside a metal cabinet

    The EMN can be installed inside a metal cabinet subject to the respect of certain guidelines. Pease refer to the Wi-LEM user guide (download there):

    • do not install EMN in the middle of electrical cables,
    • put it on a side with its antenna pointing towards a door slit or any opening,
    • systematically add a MeshNode outside the cabinet in the vicinity (less than 5m).
  • Minimum distance between several EMNs installed on a DIN Rail

    When several EMNs are installed on a DIN Rail, it is recommended to keep a free area on the left side where the antenna is, as represented by the arrow on the drawing below. Experience shows that this distance should be at least 20 mm.

    The same distance should be respected with regards to any other object or conductor/cable

  • Installing the EMN case out of the cabinet where the CTs / RTs should be (e.g. due to limited space)

    The CTs / RTs are integral parts of the EMN. The cables are directly soldered on the printed circuit board inside the case. It is not possible to disconnect them (e.g. to pass the cables through conduits or cabinet’s holes) without affecting the EMN performance that is depending on the factory calibration process of the whole device. The only way it to pass all the CT or RT through a big enough conduit or hole.

  • EMN counters overflow (accumulated values)

    In an EMN, both the accumulated active & reactive energy values are stored into a 32-bit signed register (i.e. 2 Modbus registers). The value is signed and 31 bits are significant, so that the EMN can store up to the value 0x 7fff ffff (i.e. the decimal value 2’147‘483’647). Then, in order to get the maximal Energy value, this maximal register value must be divided by the scaling factor.

    For instance for a 5A EMN type, each of the counter values must be divided by 8, and the maximum active energy is 268’435’456 Wh. A 50A EMN type, having a scaling factor of 0.8, can measure up to 2’684’354’558 Wh.

    Actually the scaling factor is in inverse proportion to the nominal range value, so whatever the EMN type taken for the following calculation, the result is the same.

    If we consider the maximum current measured by a 5A EMN (120 % of nominal current. i.e 6A), with the maximum allowed voltage (300V), we get a maximum load of 6A * 300V = 1800W on 1 phase. The EMN is in this case able to count up to 149’130 hours before the roll over, meaning 6213 days, i.e. more than 17 years on 1 phase and quite 6 years for the registers reporting the sum of the 3 phases, in case of maximal load on each phase !

  • EMN’s interval-based energy registers overflow

    In an EMN, the active & reactive energy values recorded during a specific interval time are stored into 16-bit signed registers. Their raw value, before being divided by the scaling factor, is therefore limited to 32’767. This limit may be reached in case of high load current value with the recording interval time higher than the default 5 minutes value. Please refer to the tables given in the Wi-LEM user guide V7, p. 4-5 (download there). Note that the registers reporting the sum of the 3 phases will first overflow.

    As an example, the first overflow occurs with a 10-minute interval time on the sum with a current around 85% Ipn.

Wi-LEM: About Mesh Node and other devices

  • Mesh Node’s PWR LED is OFF while external DC power supply is connected

    Check the internal ON / OFF switch.

  • Check the internal ON / OFF switch. Specific Wi-Pulse characteristics
    1. Max input voltage 3.3V
    2. Input impedance selectable by jumper
    3. High level input 0.8V min, Low level input 0.15V max.

    With regards to the Wi-Pulse, the internal electronic circuit is powered at 3.3V and in particular the pull-up resistor (to 3.3V) set on input. Consequently it is recommended to drive such input from an open collector circuit, and if this is not the case, to ensure it never exceeds 3.3V. Otherwise, it could damage the internal electronics. For each counter, you can select the input pull-up resistor with jumpers marked as: L for 1.5 KΩ, M for 10 KΩ and H for 100 KΩ.

    Input is set by default with 100 K pull-up, enabling 33 uA pulse drive. The input characteristics can be adapted to the pulse meter output and cable characteristics if it is required to drive more current (e.g. 330 uA or 2.2 mA). The purpose is to get acceptable voltage levels on such input.

    The input is considered to be at high logical level for any voltage above 0.8V and low logical level for any voltage below 0.15V.

  • Wi-Temp, Wi-Zone, Wi-Pulse interval time

    As described in the Wi-LEM user guide (download there), the interval time of Wi-Temp, Wi-Zone, Wi-Pulse is adjustable in the register #363 with the following possible values: 5, 6, 10, 12, 15, 20, 30 or 1 min.

    By default, the Wi-Zone as well as the Wi-Temp and Wi-Pulse, are set with a 1 minute interval time in order to accelerate the detection of online devices during commissioning. Then, it is highly recommended to change it to 5 minutes at least to reduce the consumption and to increase the battery life.

    The lower the interval time, the higher the consumption, as the device is communicating more often.

    With an interval time of 1 minute, the maximum battery life is estimated to 1 year for 3xAAA alkaline batteries!